반응형
👋 들어가기 전
SwiftUI를 통해 클론코딩을 할 때, 많이 등장하는 개념인데, 이제는 슬슬 학습할 때가 된 것 같다.
현재하고 있는 플젝에서도 적극적으로 도입할 예정!
🔑 PreferenceKey
🧩 역할
A view with multiple children automatically combines its values for a given preference into a single value
visible to its ancestors.
하위뷰가 상위뷰로 전달하고 싶은 값(Preference)을 지정할 떄 사용하는 Key
보통 상위 -> 하위로는 많이 전달했지만, 하위 -> 상위로 전달하는 역전 형태는 PreferenceKey를 이용하면
깔끔하게 처리할 수 잇음
🎯 자주쓰이는 용도
- 뷰 크기/위치 측정
- 스크롤 위치 추적
- 커스텀 레이아웃
🧱 구조
struct MyPreferenceKey: PreferenceKey {

    associatedtype Value
    static var defaultValue: Self.Value
    static func reduce(value: inout Self.Value, nextValue: () -> Self.Value)

}
- defaultValue
- 명시적인 초기 값이 없을 경우, 사용할 기본 값
- reduce
- 이전에 누적된값을 수정하여, 하나의 값으로 결합 하는 함수
- view-tree 순서로 값을 받음 (아래에서 설명)
- value
- 이전 호출의 결과로 누적된 값
- nextValue
- 새로 전달 받은 값
📨 값 수신 받기
onPreferenceChange(_:perform:) 메서드를 이용
 @preconcurrency @inlinable nonisolated public func onPreferenceChange<K>(
     _ key: K.Type = K.self,
    perform action: @escaping @Sendable (K.Value) -> Void
) -> some View where K : PreferenceKey, K.Value : Equatable
수신 받을 PreferenceKey를 넣어주고, closure로 갱신된 값을 받는다.
📤 값 송신 하기
preference(key:value:) 메서드 이용
nonisolated
func preference<K>(
    key: K.Type = K.self,
    value: K.Value
) -> some View where K : PreferenceKey
Key에 해당하는 value를 넣어줌, 약간 딕셔너리 같음
🤖 예제 코드
예제 코드를 통해, 위에서 설명한 view-tree 순으로 호출된다는 느낌을 알아보자.
1️⃣ Key 선언
문자열 배열을 계속 누적함, 먼저 호출들어오는 값이 누군지 추적하려고 만듬
// 1) PreferenceKey 정의 — 값은 문자열 배열
struct OrderPreferenceKey: PreferenceKey {
    static var defaultValue: [String] = []

    // reduce가 어떻게 호출되는지 콘솔로 확인할 수 있게 print 추가
    static func reduce(value: inout [String], nextValue: () -> [String]) {
        let next = nextValue()
        print("reduce called. accumulated: \(value) next: \(next)")
        // "view-tree order"를 그대로 보존하려면 append 순서 유지
        value.append(contentsOf: next)
    }
}
2️⃣ 하위 뷰, 송신자 선언
struct ChildLabel: View {
    let id: String
    var body: some View {
        Text("Child \(id)")
            .padding(8)
            .background(Color(white: 0.95))
            // preference로 자신의 식별자 전달
            .preference(key: OrderPreferenceKey.self, value: [id])
            .onAppear {
                print("onAppear child \(id)")
            }
    }
}
3️⃣ 부모뷰, 수신자 선언
struct PreferenceOrderDemoView: View {
    @State private var receivedOrder: [String] = []

    var body: some View {
        VStack(spacing: 20) {
            Text("Received order: \(receivedOrder.joined(separator: ", "))")
                .padding()
                .multilineTextAlignment(.center)

            // 구조 1: 평평한(Flat) 선언 순서 A, B, C
            VStack {
                Text("Flat order (A, B, C):")
                HStack {
                    ChildLabel(id: "A")
                    ChildLabel(id: "B")
                    ChildLabel(id: "C")
                }
            }
            .padding()

            // 구조 2: 중첩 구조 (D 안에 E, F) 그리고 G — depth-first 예상: E, F, D, G 혹은 D 먼저?
            VStack {
                Text("Nested order (D contains E & F, then G):")
                VStack {
                    HStack {
                        ChildLabel(id: "E")
                        ChildLabel(id: "F")
                    }
                    // D를 표현하기 위해 E/F와 함께 D도 preference를 넣어봄
                    ChildLabel(id: "D")
                }
                ChildLabel(id: "G")
            }
            .padding()
        }
        .onPreferenceChange(OrderPreferenceKey.self) { value in
            print("onPreferenceChange received: \(value)")
            receivedOrder = value
        }
        .padding()
    }
}
4️⃣ 구조 및 결과해석

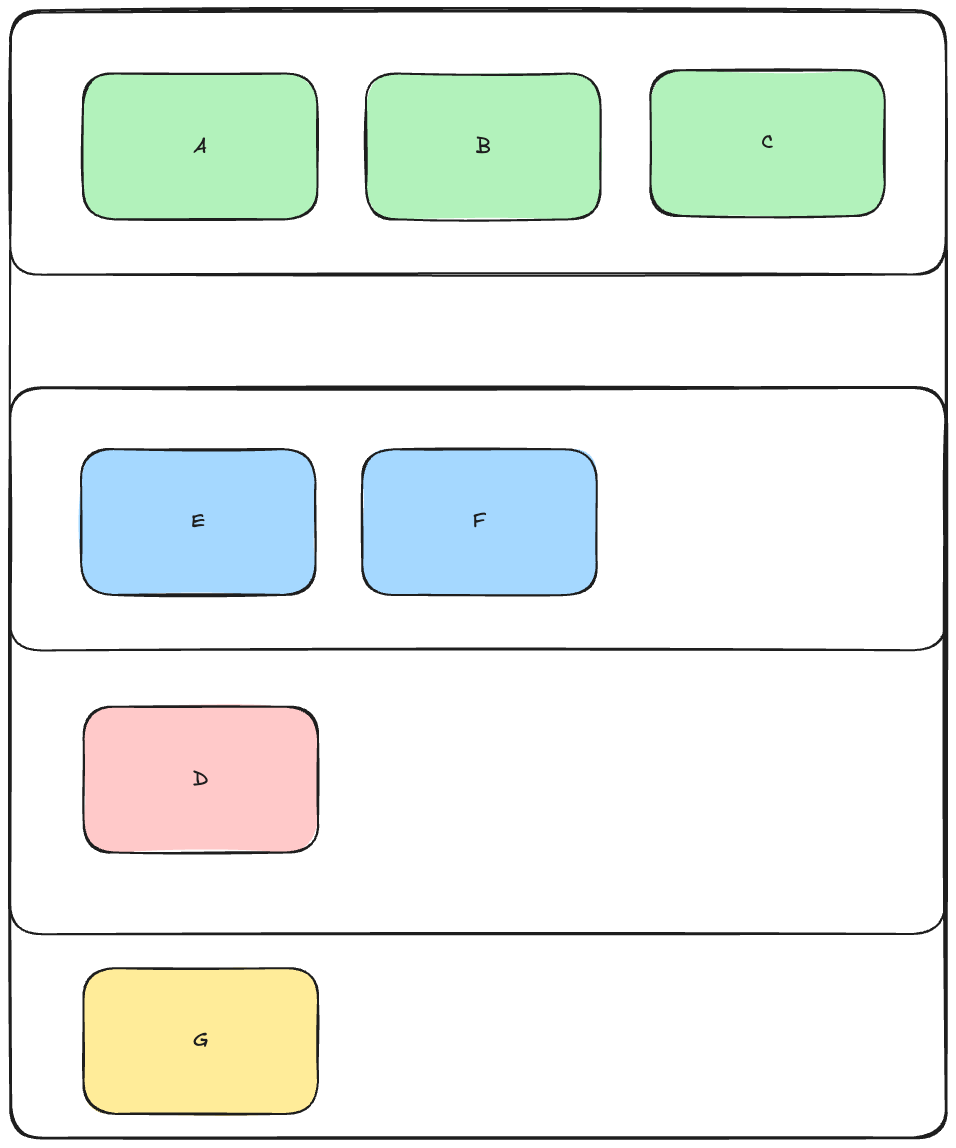

구조는 위에서 아래로, 왼쪽에서 오른쪽 순이 먼저다.
트리의 in-order 방식으로 보면 될 것 같다.
출력도 한번 비교해보자.
reduce called. accumulated: ["A"] next: ["B"]
reduce called. accumulated: ["A", "B"] next: ["C"]
reduce called. accumulated: ["E"] next: ["F"]
reduce called. accumulated: ["E", "F"] next: ["D"]
reduce called. accumulated: ["E", "F", "D"] next: ["G"]
reduce called. accumulated: ["A", "B", "C"] next: ["E", "F", "D", "G"]
onPreferenceChange received: ["A", "B", "C", "E", "F", "D", "G"]
onAppear child G
onAppear child D
onAppear child F
onAppear child E
onAppear child C
onAppear child B
onAppear child A
출처
https://developer.apple.com/documentation/swiftui/preferencekey
PreferenceKey | Apple Developer Documentation
A named value produced by a view.
developer.apple.com
반응형
'iOS > SwiftUI' 카테고리의 다른 글
| 커스텀 DynamicScrollTabVIew 만들기 (0) | 2025.10.26 |
|---|---|
| @NameSpace (0) | 2025.10.25 |
| .id (0) | 2025.10.23 |
| containerRelativeFrame (0) | 2025.10.23 |
| SwiftUI 동작 방식 (0) | 2025.10.18 |